There are several reasons why you may
experience a browser redirect,however the most likely cause it’s a computer virus.
Browser redirect viruses are not something new and malware developers have been using this technique for years to generate traffic to their sites,gathering search terms and redirect users to websites from where they’ll receive a commission or some sort of revenue.
Your browser can be redirected while you do a Google, Yahoo or Bing search and in this case the malicious programs will hijack you search results and redirect you to similar websites.And in other cases will redirect you while you are trying to load a webpage ,will instead redirect you to a tracking websites and only afterwards allow you to go to your desired site.


So what type of infections can cause this browser redirects? TDL4 rootkits ,bootkits which will infectyour Master Boot Record and malicious browser add-ons are known to cause this malicious behavior.
This type of infections are designed specifically to make money. It generates web traffic, collects sales leads for other dubious sites, and tries to fool the victim into paying for useless software. If those tricks don’t work it can kick up the threat level by downloading additional malicious or misleading programs.
Please perform all the steps in the correct order. If you have any questions or doubt at any point, STOP and ask for our assistance using the comment box.
We recommend that you first try to run the below scans while your computer is in Normal mode, and only if you are experiencing issues, should you try to start the computer in Safe Mode with Networking.
To start your computer Start your computer in Safe Mode with Networking, you can follow the below steps:
Because this utility will only stop “Windows Update can not continue as your Software copy is Expired/Corrupt” running process and does not delete any files, after running it you should not reboot your computer as any malware processes that are configured to start automatically will just be started again.
This step should be performed only if your issues have not been solved by the previous steps.
This step should be performed only if your issues have not been solved by the previous steps.
This step should be performed only if your issues have not been solved by the previous steps.
experience a browser redirect,however the most likely cause it’s a computer virus.
Browser redirect viruses are not something new and malware developers have been using this technique for years to generate traffic to their sites,gathering search terms and redirect users to websites from where they’ll receive a commission or some sort of revenue.
Your browser can be redirected while you do a Google, Yahoo or Bing search and in this case the malicious programs will hijack you search results and redirect you to similar websites.And in other cases will redirect you while you are trying to load a webpage ,will instead redirect you to a tracking websites and only afterwards allow you to go to your desired site.
So what type of infections can cause this browser redirects? TDL4 rootkits ,bootkits which will infectyour Master Boot Record and malicious browser add-ons are known to cause this malicious behavior.
This type of infections are designed specifically to make money. It generates web traffic, collects sales leads for other dubious sites, and tries to fool the victim into paying for useless software. If those tricks don’t work it can kick up the threat level by downloading additional malicious or misleading programs.
How to remove any browser redirect (Virus Removal Guide)
This page is a comprehensive guide which will remove any browser hijackers that might have been installed on your machine.Please perform all the steps in the correct order. If you have any questions or doubt at any point, STOP and ask for our assistance using the comment box.
To remove the browser redirect, follow these steps:
STEP 1: Scan your computer with Kaspersky TDSSKiller
STEP 2: Stop the malicious processes with Rkill
STEP 3: Scan your computer with Malwarebytes Anti-Malware
STEP 4: Scan your computer with HitmanPro
(OPTIONAL) STEP 5: Scan your computer with AdwCleaner
(OPTIONAL) STEP 6: Scan your computer with Zemana AntiMalware
(OPTIONAL) STEP 7: Reset your browser to default settings
OPTIONAL: Some forms of malware will not allow you to start
some of the below utilities and on-demand scanners, while running
Windows in Normal mode. If this happens, we recommend that you start
your computer in Start your computer in Safe Mode with Networking, and
try from there to perform the scan.STEP 1: Scan your computer with Kaspersky TDSSKiller
STEP 2: Stop the malicious processes with Rkill
STEP 3: Scan your computer with Malwarebytes Anti-Malware
STEP 4: Scan your computer with HitmanPro
(OPTIONAL) STEP 5: Scan your computer with AdwCleaner
(OPTIONAL) STEP 6: Scan your computer with Zemana AntiMalware
(OPTIONAL) STEP 7: Reset your browser to default settings
We recommend that you first try to run the below scans while your computer is in Normal mode, and only if you are experiencing issues, should you try to start the computer in Safe Mode with Networking.
To start your computer Start your computer in Safe Mode with Networking, you can follow the below steps:
- Remove all floppy disks, CDs, and DVDs from your computer, and then restart your computer.
- If you are using Windows XP, Vista or 7 press and hold the F8 key as your computer restarts.Please keep in mind that you need to press the F8 key before the Windows start-up logo appears.
Note: With some computers, if you press and hold a key as the computer is booting you will get a stuck key message. If this occurs, instead of pressing and holding the “F8 key”, tap the “F8 key” continuously until you get the Advanced Boot Options screen.If you are using Windows 8, press the Windows key + C, and then click Settings. Click Power, hold down Shift on your keyboard and click Restart, then click on Troubleshoot and select Advanced options. - In the Advanced Options screen, select Startup Settings, then click on Restart.
- If you are using Windows XP, Vista or 7 in the Advanced Boot Options screen, use the arrow keys to highlight Safe Mode with Networking , and then press ENTER.
![[Image: Safemode.jpg]](https://malwaretips.com/images/removalguide/safemode.jpg "Safe Mode with Networking screen") \
\
If you are using Windows 8, press 5 on your keyboard to Enable Safe Mode with Networking.
Windows will start in Safe Mode with Networking.
STEP 1: Scan your computer with Kaspersky TDSSKiller
In this first step, we will run a system scan with Kaspersky TDSSKIller to remove any malicious software that might be installed on your system.- Please download the latest official version of Kaspersky TDSSKiller.
KASPERSKY TDSSKILLER DOWNLOAD LINK(This link will automatically download Kaspersky TDSSKiller on your computer.) - Double-click on tdsskiller.exe to open this utility, then click on Change Parameters.

- In the new open window,we will need to enable Detect TDLFS file system, then click on OK.

- Next,we will need to start a scan with Kaspersky, so you’ll need to press the Start Scan button.

- Kaspersky TDSSKiller will now scan your computer for malware.

- When the scan has finished it will display a result screen stating
whether or not the infection was found on your computer. If it was found
it will display a screen similar to the one below.

- To remove the infection simply click on the Continue button and TDSSKiller will attempt to clean the infection.A reboot will be require to completely remove any infection from your system.
STEP 2: Stop the malicious processes with Rkill
RKill is a program that will attempt to terminate all malicious processes associated with “Windows Update can not continue as your Software copy is Expired/Corrupt” infection, so that we will be able to perform the next step without being interrupted by this malicious software.Because this utility will only stop “Windows Update can not continue as your Software copy is Expired/Corrupt” running process and does not delete any files, after running it you should not reboot your computer as any malware processes that are configured to start automatically will just be started again.
- While your computer is in Safe Mode with Networking, please download Rkill from the below link.
RKILL DOWNLOAD LINK (his link will open a new web page from where you can download “RKill”) - Double click on Rkill program to stop the malicious programs from running.

- RKill will now start working in the background, please be patient
while this utiltiy looks for malicious process and tries to end them.

- When the Rkill tool has completed its task, it will generate a log.
Do not reboot your computer after running RKill as the malware programs
will start again.

STEP 3: Scan your computer with Malwarebytes Anti-Malware
Malwarebytes Anti-Malware is a powerful on-demand scanner which should remove all types of malware from your machine. It is important to note that Malwarebytes Anti-Malware will run alongside antivirus software without conflicts.- You can download download Malwarebytes Anti-Malware from the below link.
MALWAREBYTES ANTI-MALWARE DOWNLOAD LINK (This link will open a new web page from where you can download “Malwarebytes Anti-Malware”) - Once downloaded, close all programs, then double-click on the icon on your desktop named “mbam-setup” to start the installation of Malwarebytes Anti-Malware.

You may be presented with a User Account Control dialog asking you if you want to run this file. If this happens, you should click “Yes” to continue with the installation.

- When the installation begins, you will see the Malwarebytes Anti-Malware Setup Wizard which will guide you through the installation process.

To install Malwarebytes Anti-Malware on your machine, keep following the prompts by clicking the “Next” button.

- Once installed, Malwarebytes Anti-Malware will automatically start
and will update the antivirus database. To start a system scan you can
click on the “Scan Now” button.

- Malwarebytes Anti-Malware will now start scanning your computer for
malware. When Malwarebytes Anti-Malware is scanning it will look like
the image below.

- When the scan has completed, you will be presented with a screen
showing the malware infections that Malwarebytes Anti-Malware has
detected. To remove the malicious programs that Malwarebytes
Anti-malware has found, click on the “Remove Selected” button.

- Malwarebytes Anti-Malware will now quarantine all the malicious
files and registry keys that it has found. When removing the files, Malwarebytes Anti-Malware may require a reboot
in order to remove some of them. If it displays a message stating that
it needs to reboot your computer, please allow it to do so.

After your computer will restart, you should open Malwarebytes Anti-Malware and perform another scan to verify that there are no remaining threats
STEP 4: Scan your computer with HitmanPro
HitmanPro can find and remove malware, adware, bots, and other threats that even the best antivirus suite can oftentimes miss. HitmanPro is designed to run alongside your antivirus suite, firewall, and other security tools.- You can download HitmanPro from the below link:
HITMANPRO DOWNLOAD LINK (This link will open a new web page from where you can download “HitmanPro”) - Double-click on the file named “HitmanPro.exe” (for 32-bit versions of Windows) or “HitmanPro_x64.exe” (for 64-bit versions of Windows).

Click on the “Next” button, to install HitmanPro on your computer.

- HitmanPro will now begin to scan your computer for malware.
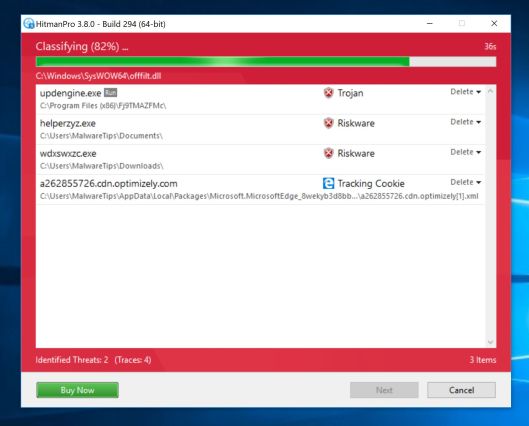
- When it has finished it will display a list of all the malware that
the program found as shown in the image below. Click on the “Next” button, to remove malware.

- Click on the “Activate free license” button to begin the free 30 days trial, and remove all the malicious files from your computer.

(OPTIONAL) STEP 5: Scan your computer with AdwCleaner
The AdwCleaner utility will scan your computer and web browser for the malicious files, browser extensions and registry keys, that may have been installed on your computer without your knowledge.This step should be performed only if your issues have not been solved by the previous steps.
- You can download AdwCleaner from the below link.
ADWCLEANER DOWNLOAD LINK (This link will open a new web page from where you can download “AdwCleaner”) - Before starting AdwCleaner, close your web browser, then double-click on the AdwCleaner icon.

If Windows prompts you as to whether or not you wish to run AdwCleaner, please allow it to run.

- When the AdwCleaner program will open, click on the “Scan” button as shown below.

AdwCleaner will now start to search for adware and other malicious programs. - To remove the malicious files that were detected in the previous step, please click on the “Clean” button.

- AdwCleaner will prompt you to save any open files or documents, as
the program will need to reboot the computer to complete the cleaning
process. Please do so, and then click on the “OK” button.

When your computer reboots and you are logged in, AdwCleaner will automatically open a log file that contains the files, registry keys, and programs that were removed from your computer. Please review this log file and then close the notepad window.
(OPTIONAL) STEP 6: Scan your computer with Zemana AntiMalware
Zemana AntiMalware is a powerful utility which will remove malicious browser extensions and other malware from Windows.This step should be performed only if your issues have not been solved by the previous steps.
- You can download Zemana AntiMalware from the below link:
ZEMANA ANTIMALWARE DOWNLOAD LINK (This link will start the download of “Zemana AntiMalware”) - Double-click on the file named “Zemana.AntiMalware.Setup.exe” to start the installation of Zemana AntiMalware.

You may be presented with a User Account Control dialog asking you if you want to run this file. If this happens, you should click “Yes” to continue with the installation.

- Click on the “Next” button, to install Zemana AntiMalware on your computer.

- When Zemana AntiMalware will start, click on the “Scan” button.

- Zemana AntiMalware will now scan computer for malicious files. This process can take up to 10 minutes.

- When Zemana AntiMalware has finished it will display a list of all the malware that the program found. Click on the “Next” button, to remove the malicious files from your computer.

Zemana AntiMalware will now remove all the detected malicious files, and at the end a system reboot may be required to remove all traces of malware.
(OPTIONAL) STEP 7: Reset your browser to default settings
If you are still experiencing issues with any browser hijacker in Internet Explorer, Firefox or Chrome, we will need to reset your browser to its default settings.This step should be performed only if your issues have not been solved by the previous steps.
You can reset Internet Explorer settings to return them to the state they were in when Internet Explorer was first installed on your PC.
- Open Internet Explorer, click on the “gear icon”
 in the upper right part of your browser, then click again on Internet Options.
![[Image: Internet Options in Internet Explorer]](https://malwaretips.com/blogs/wp-content/uploads/2014/03/Internet-Options-Internet-Explorer.jpg "Click on the Gear Icon then on Internet Options")
- In the “Internet Options” dialog box, click on the “Advanced” tab, then click on the “Reset” button.
![[Image: Reset Internet Explorer]](https://malwaretips.com/blogs/wp-content/uploads/2014/03/Reset-Internet-Explorer.jpg "In the Advanced tab click on the Reset button")
- In the “Reset Internet Explorer settings” section, select the “Delete personal settings” check box, then click on “Reset” button.
![[Image: Reset Internet Explorer to its default settings]](https://malwaretips.com/blogs/wp-content/uploads/2014/03/reset-button-Internet-Explorer.jpg "Click on the Reset button to revert IE to its default settings")
- When Internet Explorer has completed its task, click on the “Close”
button in the confirmation dialogue box. You will now need to close
your browser, and then you can open Internet Explorer again.
![[Image Reset Internet Explorer settings]](https://malwaretips.com/blogs/wp-content/uploads/2014/03/Close-button-Reset.jpg "Click on the Close button")
Your computer should now be free of malware.
If you are still experiencing problems while trying to remove any browser redirect from your machine, please start a new thread in our Malware Removal Assistance forum.
If you are still experiencing problems while trying to remove any browser redirect from your machine, please start a new thread in our Malware Removal Assistance forum.